Setting your knife pressure on varying materials can be tricky on any plotter or label finisher. They LX610e is pretty simple but there are still things you need to be aware of so here is some help as to understanding knife pressure on the DTM Print LX610e.
Is there a table to rely on for the Knife Pressure setting?
It would take some more magic here to have one – but we do have a good guideline that guides you to the proper settings.
Knife Pressure (as well as stretch factor) depends on ambient temperature/humidity and many other additional factors such as life cycles and machine life of the LX610e.
Plus, knives slightly differ in length and sharpness.
There’s a small tolerance of length in the knives and also the sharpness is not identical on all knives.
Our printer with its software makes the best out of it and most time little variations will go unnoticed.
How to achieve the proper Knife Pressure?
There’s one answer: testing.
Finding the correct setting for your media/knife combination will probably require a few test prints so that you can gradually adjust the Knife Pressure if the cut is too deep or too low.
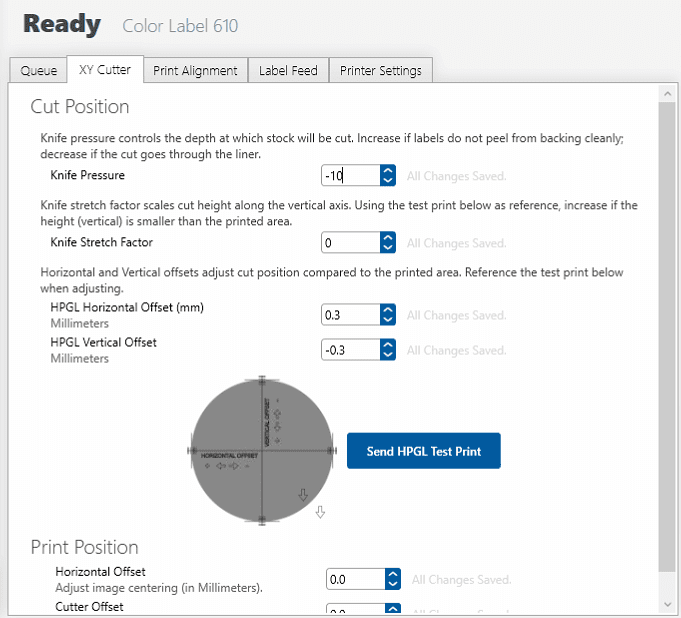
- We recommend starting with Knife Pressure -10 on a new knife.
- Use the ‘Send HPGL Test Print’ button in PrintHub (PC) / LX610eConfig (Mac) to check the actual cut using those initial settings (see screenshots attached).
- Peel off the matrix (label material around the cut label) to check if the cut is deep enough for the label layer, but not so deep that you cut through the backing paper/liner.
- Adjust the Knife Pressure value moderately in one to two intervals to a positive (if the cut is not deep enough) or negative (if the cut is too deep) value.
- Repeat steps 2-4 until you’re satisfied with the cut depth.
Side Note: The Knife Pressure maximum is +/- 32, for the users safety to prevent unnecessary wear of consumables.
If your knife doesn’t cut deep enough with +32, the knife is likely too dull to make a sharp or consistent cut and needs to be replaced.

A successful cut comes with a correctly inserted knife.
When installing the knife holder make sure it goes all the way down until you feel the ‘stop’.
More on that in the LX610e manual at http://dtm-print.eu/manuals-read/lx610e/lx610e-pages/page12.html
Why’s that?
The knife is magnetically controlled. A metal pin moves closer to the knife on the magnet parallely (like a pincer). If the knife is inserted too high (wrong), the pin needs to move deeper, which also means: closer to the magnet.
Think about approaching two magnets, one in each hand.
The force gets exponentially stronger, so once they’re only millimetres apart you can’t hold them apart any longer.
It’s the same here: the force gets stronger and the knife cuts through the entire label (no matter the ‘Knife Pressure’ settings).
If you like to get a more technical description on this, write me.
What else affects a proper cut?
We offer knives with different angles to choose for your LX610e system: 30°, 45° and 60°, but most of you use the 45° knives.
Our LX610e Pro bundle includes one 45° knife.
Generally spoken, everything works with a 45° knife in some way.
But on some thicker or thinner materials or fine details a different knife angle may improve the cut.
There’s a two page PDF that explains the different knife angles and their benefits.
Click here: http://dtm-print.eu/downloads/supplies/LX610e-CutterKnives-Angles.pdf
This PDF also includes an overview which knife angle is recommended for each Genuine DTM Label Stock.
Nevertheless, if you’re not satisfied with the cut of your chosen knife angle,
it’s always worth trying a different angle than listed and see if that improves your cut.
We also recommend using rounded corners instead of 90° edges as such will make your life easier when peeling off the labels!
For more help or samples from the LX610, please talk to the team at HD Labels.
Get in touch


